Welcome to Webmail Help
Webmail provides you with access to your personal email, calendar, contacts and file information from any browser, whether on your laptop, desktop, or mobile devices.
Welcome to Webmail Help
General
What browsers can I use to view my mail?
What makes up the Webmail application?
Navigating Webmail using the sidebar
Work Area
Mail
What are the Mail features?
How do I check to see if I have new mail?
How do I select multiple messages?
How do I mark one or more messages as spam?
What if the message is not spam?
How do I manually mark one or more messages as read or unread?
How do I flag messages?
How do I delete messages?
Composing messages
How do I compose and send a new message?
How do I reply, reply to all or forward a message?
How do I use the text editor options?
How do I use Spellcheck?
How do I insert an image in my message?
How do I attach a file to a message?
Is there a limit to the size of the emails that I can send?
Using Mail Folders to organize
What are system Mail folders?
What are personal Mail folders?
How do I add a new folder?
How do I sort messages within a folder?
How can I find a specific message within a folder?
How do I rename, empty, or delete a folder?
How do I move one or more messages to another folder?
How do I set up Webmail to automatically move messages to folders?
Contacts
What is the Contacts tab?
How do I add a contact?
How do I select multiple contacts?
How do I search for contacts?
Using groups in Contacts
How do I create a group?
How do I add one or more contacts to a group?
How do I remove contacts from a group?
How do I rename or delete a group?
Importing contacts
Can I import contacts?
Calendar
What is the Calendar component?
How do I add a new calendar?
How do I edit a calendar?
How do I delete a calendar?
How do I add an event to my calendar?
How do I edit an event?
How do I delete an event?
Files
What is the Files component?
How do I upload files to my Files section?
What type of files can I upload?
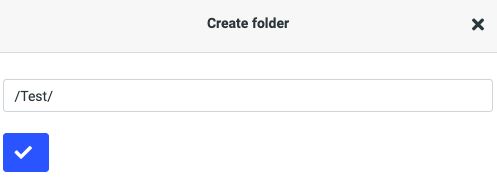
How do I create folders?
How do I move files into a folder?
How do I delete a file or folder?
How do I create a subfolder?
Can I reorder my file folders?
Can I take a file that was sent to me in an email and save it to my Files section?
Can I take a file that is saved in my Files section and attach it to an email?
How do I share files or folders?
Settings
What is the Settings component?
Settings options and locations
Preferences map
Folders
Identities
Responses
Other accounts
Password
Autoresponder
Spam settings
Mail forwarding
Password recovery
Filters
External access
How do I change my password?
How do I enable and disable my vacation or out of office alert?
How do I enable and disable my email signature?
What are Mail filters?
What is plus sign tagging and how do I use it with filters?
How do I add or remove mail filters?
How do I add or remove another email account?
How do I set an allowed or blocked senders list?
Admin
What is the Admin component?
Managing users
How do I create a new user?
Basic Settings
Sending & Receiving
Forwarding
Autoresponder
Spam Settings
Webmail & Metadata
How do I view and modify users?
Basic Settings
Tools & Status
How do I suspend a user?
How do I delete a user?
How do I restore a deleted user?
How do I restore deleted mail for a user?
How do I release spam messages for a user?
Where can I view usage data for a user?
Using workgroups
How do I create a workgroup?
How do I add users to a workgroup?
How do I delete a workgroup?
General
What browsers can I use to view my mail?
Webmail supports the following browsers:
- Microsoft Internet Explorer 9.0 and higher
- Mozilla Firefox 2.0 and higher
- Chrome 1.0 and higher
- Safari 3.2 and higher
- Konqueror 3.5 and higher
Note: You may be able to view the Webmail interface on other, unsupported browsers; however, some features may produce unexpected results.
What makes up the Webmail application?
Webmail is comprised of the following components: Mail, Contacts, Files, Calendar, RSS (optional), Admin (on applicable accounts), and Settings. Each part is tied together with the sidebar and contains a work area.
Back to top
Navigating Webmail using the sidebar
The sidebar in webmail is available on the left-hand side of the window no matter which component that you’re currently viewing. The sidebar includes:
- Access to the six Webmail components
- Quick access to compose new messages
- Admin access depending on your account
- Help access
- A Logout button
Work Area
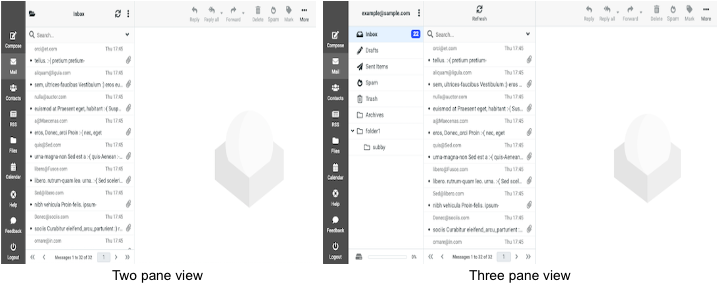
Each Webmail component is divided into two or three work areas which are designed to take advantage of a wide-screen view. These sections automatically hide as you shrink the web browser down in size but is still accessible by a toggle at the top of the visible pane.
Back to top
Mail
What are the Mail features?
As the default view, the Mail tab provides you with access to essential email functions. It has three main panes, including the Mail folders list, message list and message preview.
How do I check to see if I have new mail?
To check for new mail, click Refresh from the toolbar. The contents of all system and user-defined folders are updated immediately.
Back to top
How do I select multiple messages?
- Access the Mail tab.
- Click the Select button at the top of the message list.
- Use the checkbox that appears beside each message to select or unselect.
Note: The message details pane does not display information for multiple selections.
- Once you have all the messages that you'd like selected, you can move the message into a folder, delete all, flag them or report them as Spam.
How do I mark one or more messages as spam?
Clicking the Spam button results will move the message to the Spam folder, and it sends information to the spam filtering engine so that the filtering rules can be updated to catch future similar spam messages. This helps update webmail filtering and improves it to reflect the current trends of spammers.
Note: Messages in the Spam folder are automatically deleted after 30 days.
To mark one or more messages as Spam:
- Select the message(s) you would like to mark as Spam.
- Click the Spam button from the message list toolbar.
- The message is moved to your Spam folder.
Back to top
What if the message is not spam?
Legitimate emails can accidentally be tagged as spam. There are many reasons for this including, but not limited to, message subject, content, or message routing.
Any message that has been marked as spam and sent to your Spam folder will be deleted after 30 days. For this reason, it is good practice to review the contents of your Spam folder occasionally.
To mark one or more messages as not spam:
- Select the message(s) you would like to mark as not spam.
- Click the Not spam button from the message list toolbar.
Marking a message as Not spam will both move the message to your Inbox, and it sends information to the spam-filtering engine so that the filtering rules can be updated to improve future recognition of valid emails similar to the one marked.
Back to top
How do I manually mark one or more messages as read or unread?
- Select the message(s) you would like to mark as read or unread.
- From the Mark drop-down list in the header, choose As read or As unread.
Alternatively, click the circle icon beside the message.
How do I flag messages?
If there are messages that you want to return to at a later time, you can flag them to make them easier to find later on. Flagged messages display in the column.
- Select the message(s) you want to flag.
- From the Mark drop-down list in the header, choose As flagged or hover to the right of the message in the message list and click the flag icon when it comes available.
To remove the flag from one or more messages, select the messages, and from the Mark drop-down menu, choose As unflagged.
Back to top
How do I delete messages?
- Select the message(s) you would like to delete.
Alternatively, click a message to display its contents in the message details pane.
- Click the Delete button.
- When messages are deleted from the Inbox, Sent, Drafts or user-defined folders, they are temporarily moved to the Trash folder. When messages are deleted from the Trash folder, they are permanently deleted.
Composing messages
How do I compose and send a new message?
- Click Compose.
- Address your email using the To field.
- Click the Plus icon at the end of the To field to add the option of a Cc, Bcc, Reply-to or Followup-to field.
Note: Reply-to sets a different email address that recipients will send replies to when they select reply. Followup-to is useful when posting to mailing lists so that replies are sent to the list address but not to your personal address.
- Type the subject in the Subject field.
- Compose your message and attach any attachments in the message field.
- Click Send in the bottom left-hand corner of the message window.
Back to top
How do I reply, reply to all or forward a message?
- Select the email that you would like to reply or forward from the message list.
- Choose the option that best suits your needs from the toolbar.
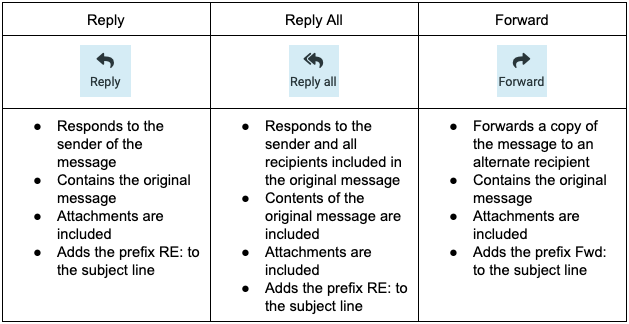
- Compose your message and select Send.
Back to top
How do I use the text editor options?
The text editor offers the ability to send as a plain text email or for additional formatting, the ability to send an HTML email.

|
Button
|
Function
|
|

|
Bold
|
|

|
Italics
|
|

|
Underline
|
|
|
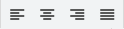
Left, center, right and justified align
|
|

|
Bulleted list
|
|

|
Numbered list
|
|

|
Decrease and increase indent
|
|

|
Changes the way the text is read from left to right or right to left as needed
|
|

|
Blockquote
|
|

|
Text color
|
|

|
Background color
|
|

|
Font family
|
|
|
Font size
|
|

|
Create or edit a hyperlink
|
|

|
Remove hyperlink
|
|

|
Create a table
|
|

|
Add an emoji (emoticon)
|
|

|
Special character menu
|
|

|
Insert and edit image
|
|

|
Insert and edit media
|
|

|
View and edit the source code
|
|

|
Find and replace
|
|

|
Undo and redo
|
Back to top
How do I use Spellcheck?
Spellcheck is available in 44 different languages from the toolbar in the compose window. Use the drop-down list to choose the language that you want to apply.
- In the drop-down list, choose the language that you are using.
As you type, any questionable spelling is highlighted.
- When Spellcheck is active (indicated by the icon being lit up), left-click highlighted words to see a list of correctly spelled replacements.
Right-click to use your browser's built-in spellcheck function. If Spellcheck is active, you'll see both lists.
- Select the correct replacement option.
- Repeat steps 2 and 3 as necessary.
How do I insert an image in my message?
You can insert images in the body of your message, and you can specify the size of those images. Inserted images are referenced by their URL and may be any type of image file format, for example, .jpg, .gif, or .png. The referenced images can be located somewhere on the Internet, or they can be in your Files folders.
- Click the insert image icon from the text editor.
- Copy and paste in the URL of the source image into the source field or select the file selection option, and choose Add file.
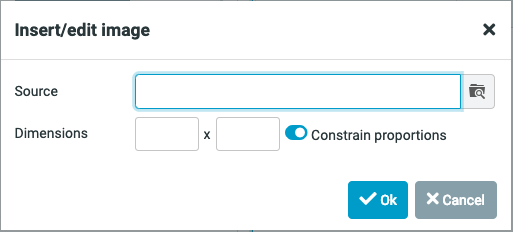
- Adjust the dimensions as needed.
- Click Ok.
Back to top
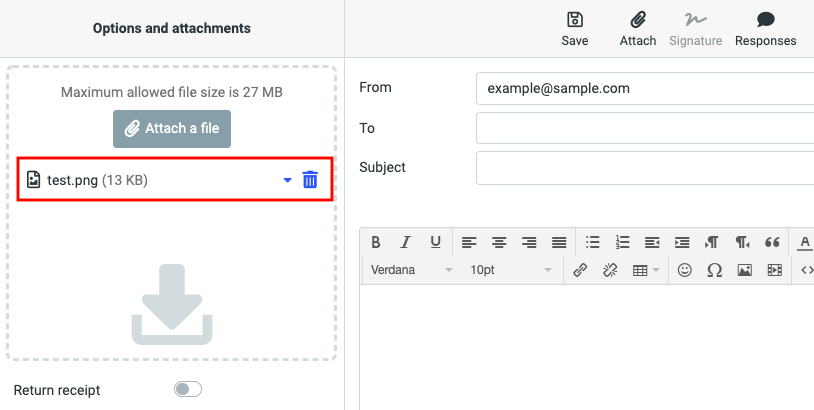
How do I attach a file to a message?
- Click the Attach button from the top toolbar.

- Browse to the file you want to attach and click Open.
- The attachment will appear in the Options and attachments pane once uploaded.
Back to top
Is there a limit to the size of the emails that I can send?
The maximum size for email messages, including any attachments, is 35 MB; however, when attachments are sent over the Internet, they must be MIME encoded, and this encoding increases the size of the message. Besides, some mail servers will not accept large email messages, so if you attach a large file to your message, it may not reach its intended recipient.
You should not try to send attachments that are larger than 27 MB. If you want to share large files, we recommend that you store them in the Files section and share the file rather than attaching it to an email.
Using Mail Folders to organize
What are system Mail folders?
The system folders (Inbox, Drafts, Spam, Sent, and Trash) are permanent system folders that support basic email functions. You cannot add, rename or remove a system folder, though you can add sub-folders to any of the system folders.
Back to top
What are personal Mail folders?
Personal folders are the user-defined folders. You can create and name folders for the personal organization of mail messages up to a system defined limit. User-defined folders can be added, renamed, removed and emptied. You can add these folders at the top, or parent, level or as sub-folders. Sub-folders can also be added to other sub-folders.
Personal folders appear below the system folder list, after the Trash folder. Sub-folders that are added to system folders appear below their parent in the system folders list.
Back to top
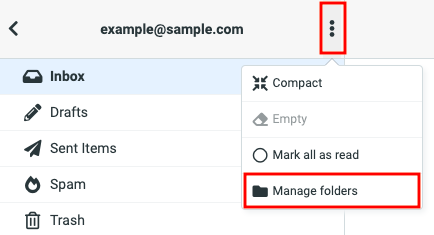
How do I add a new folder?
- At the top of the folders list, select the Menu icon (three vertical dots) and then click Manage folders.
- Click Create.
- Type the name of the new folder in the Folder name field.
- If you want to add the new folder as a sub-folder of an existing folder, choose the folder from the Parent folder drop-down list.
- From the List view mode drop-down list, choose whether you want messages in the folder to be displayed as a list or as threads.
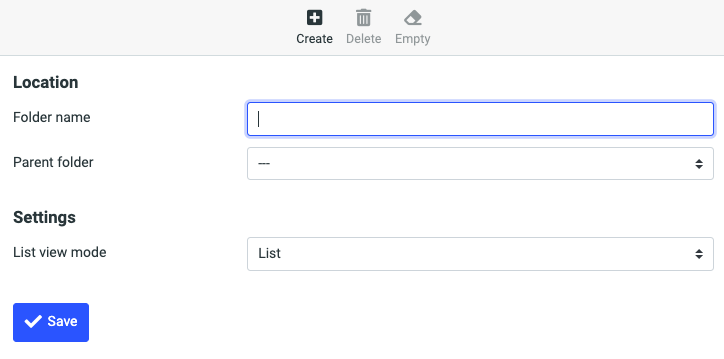
- Click Save.
The new folder appears under the systems folders list or as a sub-folder of a parent folder, depending on which option you choose.
Back to top
How do I sort messages within a folder?
When you look at a mail folder, the contents are displayed in date order from most recent to oldest. To sort messages within a folder by different criteria:
- Click the folder name in the Mail folder list.
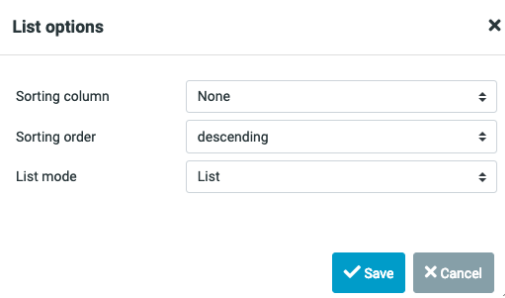
- Select Options from the toolbar over the message list.
- Choose which sorting column you would like to use—Arrival date, Sent date, Subject, From/To, From, To, CC, or Size—and select if you would like it to be ascending or descending and if you would like conversations to be grouped by threads and then click Save.
Back to top
How can I find a specific message within a folder?
You can perform a case-insensitive search for characters or words that appear in the following areas of the message:
- Subject: Search the Subject line of the message.
- From: Search the From line of the message.
- To: Search the To line of the message.
- Cc: Search the Cc line of the message.
- Bcc: Search the Bcc line of the message.
- Body: Search the body of the message.
- Entire message: Search the Sender, Subject, and Headers plus the body of the message.
Note: We recommend that you do not use the entire message search as your primary search type. Depending on how many messages there are in the selected folder, a message search can take a long time, and your Webmail session could time out before the search completes.
To search within a selected folder:
- Select the folder you want to search in by clicking on it in the Mail folder list.
- In the search field, select the type of search from the drop-down list.
- Type your search criteria in the search field and then press Enter.
- Any messages matching the criteria are displayed.
To clear the search results, click the X in the corner of the search field.
Back to top
How do I rename, empty, or delete a folder?
- At the top of the folders list, choose the Menu icon (three vertical dots) and then click Manage folders
- Click the folder that you want to rename, empty, or delete.
- Do one of the following:
- To rename the folder, enter the new name in the Folder name field, and click Save.
- To empty the folder, select Empty from the toolbar and then Delete on the confirmation message.
Note: These messages are still recoverable until you empty your Trash folder.
- To delete the folder, select Delete from the toolbar and when the confirmation pop-up appears, select Delete again.
Note: The folder is deleted, and the messages in that folder are moved to the Trash folder.
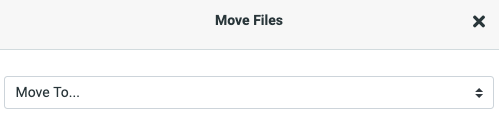
How do I move one or more messages to another folder?
- Select the message(s) that you would like to move.
- In the Mail header, click More, then click Move to, and select the folder to which you want to move the selected messages.
- Alternatively, after selecting the messages, press and hold the left mouse button and slide your cursor to the folder to which you want to move the messages, and then release the mouse button.
Back to top
How do I set up Webmail to automatically move messages to folders?
Webmail allows you to use filters to sort and order incoming mail. Mail can be identified using a combination of criteria and conditions to trigger one of three actions:
- Forward message to
- Move to folder
-
Delete email message
Contacts
What is the Contacts tab?
The Contacts tab is where you add, group, manage and delete contact information. Contacts supports drag-and-drop so you can quickly move contacts to groups. You can also address messages to one or more contacts from within the Contacts pane. The Contacts tab is divided into three panes: groups, contacts list, and contact details.
Back to top
How do I add a contact?
You can add contacts from the Contacts tab or directly from your email.
To add a contact in the Contacts tab:
- Click Contacts from the sidebar.
- Select Create from the top toolbar.
- Fill in the contact information in the blank contact card that appears in the details pane.
- Click Save.
To add a contact from your email:
- Select an email from the person that you would like to add.
- In the email details, click on the email address in the header.
- From the options, select Add to address book.

- The email will be automatically added to your address book.
Once the contact is created, you can display the contact and then click the Groups tab to assign the contact to one or more groups. Toggle on the groups where you want to add this contact. All contacts belong to the Contacts group by default, but they can be added to as many other groups as you’d like.
Back to top
How do I select multiple contacts?
- Access the contact list.
- Click the Select button at the top of the contact list.
- Use the checkbox that appears beside each contact to select or unselect.
Note: The contact details pane does not display information for multiple selections.
- Move the contacts into a group for future use, or select Compose from the sidebar to start an email to the selected contacts.
Back to top
How do I search for contacts?
The basic search located at the top of the contact list uses display name, email, first name, last name and all fields. If you want to do an advanced search,
- Click Contacts.
- Select Search from the toolbar.
- In the Advanced search pop-up, complete as many fields as you can to narrow your search. Advanced search will allow you to search by any of the contact card fields and any information entered in the search will remain if you need to change between the tabs.

- Click Search and the contacts that match your search criteria display in the Contacts list pane.
Back to top
Using groups in Contacts
How do I create a group?
Groups are an excellent way to create a list of commonly emailed contacts for quick access and easy addressing. The Groups list displays alphabetically, and contacts can be added to multiple groups at once.
- At the top of the Groups pane, click the three vertical dots icon to access the menu.
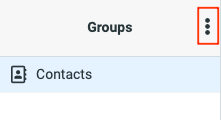
- Select Add group.
- In the pop-up, type the name of the new group in the text field.
- Click Save.
Back to top
How do I add one or more contacts to a group?
You can add contacts to a group by displaying the contact, and then selecting the group to which you want to assign the contact, or you can select one or more contacts and drag the contacts to the group.
- Dragging a contact from one group to another will result in a copy being placed in the new group.
- You can drag the same contact to multiple groups.
- You can drag multiple contacts at the same time.
To add one or more contacts to a group:
- Access the Contacts list.
- Click Select and select the contacts that you would like to add to a group.
- Drag and drop the contacts onto the group or click More and Assign to group.
Back to top
How do I remove contacts from a group?
Note: A contact cannot be removed from the Contacts group.
- From the Groups list, click the group that you want to edit.
- Click Select and choose the contacts that you want to remove from the contact list.
- Select More.
- Choose Remove from group.
Back to top
How do I rename or delete a group?
- Locate the group in Contacts.
- Click the menu button (three vertical dots at the top of the Groups menu).
- Select Rename group or Delete group.
- If renaming a group, enter the new name and select Save. The new name will appear in the groups list in alphabetical order.
- If deleting the group, select Delete in the pop-up confirmation window that appears.
Importing contacts
Can I import contacts?
Webmail allows you to import a list of contacts from another mail application that is in vCard or CSV format.
- Go to Contacts.
- Click Import in the toolbar at the top.
- In the Import contacts pop- up window, click Choose file and select to the vCard or CSV file that you want to upload.
- Select the Open button.
- Choose the group that will contain the new contacts from the Import group assignments drop-down list. If you don't select this option, the contacts will be imported into the Contacts group only.
- Select if you want to Replace your entire address book with this import.
- Click Import.
- Once you get the confirmation, close the Import contacts window by clicking the X in the upper left corner.
Back to top
Calendar
What is the Calendar component?
The Calendar component allows you to create and view calendars. The Calendar component includes:
- Day: Displays your calendar events in a day-by-day format.
- Week: Displays your calendar events in a week-by-week format.
- Month: Displays your calendar events in a month-by-month format.
- Agenda: Displays your upcoming events.
- Event creation: Lets you create and edit single or recurring events with reminders.
- Calendar sharing: Makes your calendar available to others with or without editing permissions.
How do I add a new calendar?
- Click the Calendar tab.
- Select the Menu icon (three vertical dots).
- Choose Add calendar.
- Enter a name and color for your new calendar.
- Click Save.
Back to top
How do I edit a calendar?
- Click the Calendar tab.
- Highlight the calendar you want to edit, and from the Menu icon, choose Edit/share calendar or double-click the calendar that you want to edit.
- In the calendar properties pop-up, edit the name and color of the calendar.
- Select Save.
How do I delete a calendar?
- Click the Calendar tab.
- Highlight the calendar you want to delete.
- From the Menu icon (three vertical dots), choose Delete calendar.
- In the confirmation pop-up, select Delete to confirm.
How do I add an event to my calendar?
An event is anything that you want to schedule on your calendar, for example, a meeting or an appointment.
Note: It is possible to add more than one event in the same time slot.
- Click Create or click the date when you want to add the event in the Calendar.
- Complete the fields on the Summary tab.
- Summary: The text that will appear in the calendar time slot.
- Location: The location where the event will take place.
- Calendar: Use the drop down to choose the calendar in which to schedule the event.
- Start date and End date: Click the fields and select a date or date range for the event. If All Day is not checked, you can specify the start and end times.
- Description: Enter any additional information you want about the event.
- Reminder: Set a reminder notification.
- Category: Choose from Personal, Work, Family, or Holiday.
- Status: Set the status of the event as Confirmed, Cancelled, or Tentative.
- Show me as: Choose Busy, Free, or Tentative from the menu.
- Priority: Set the priority.
- Privacy: Choose from Public, Private and Confidential.
- URL: Add a URL to the event.
- Optionally, click the Reoccurance tab and complete the following fields:
- Repeat: Choose whether you want to create a recurring event, and the frequency with which you want it to recur: Never, Daily, Weekly, Monthly, Annually or On dates.
- Every: Set how often you want the event to happen, for example, every two weeks.
- On: Set when you want the event to occur on, like the day of the week or the day of the month.
- Until: Set an end date for the repeat.
- Optionally, click the Participants tab to invite additional participants to the event.
- Optionally, click the Attachments tab and add an attachment.
- Click Save.
Back to top
How do I edit an event?
- Click the event that you want to edit.
- Click Edit.
- Make changes to any of the editable fields on any tab. Edits to recurring events will be applied to all the events.
- Click Save.
How do I delete an event?
- Click the event that you want to delete.
- Select Delete.
- In the confirmation pop-up, click Ok to confirm.
Back to top
Settings
What is the Settings component?
The Settings component allows you to configure general settings for each of the mailbox components (for example, display, and language preferences), mail settings (setup, autoresponders, signature, allow and block lists, and forwarding options), and spam settings.
Back to top
Settings options and locations
Preferences map
|
User Interface
|
Language
Time zone
Time format
Date format
Pretty dates (today, yesterday, etc.)
|
Refresh rate
Handle pop-ups as standard windows
Register protocol handler for mailto: links
|
|
Mailbox View
|
Mark messages as read
On request for return receipt
Expand message threads
|
Rows per page
Check all folders for new messages
|
|
Displaying Messages
|
Open message in a new window
Show email address with display name
Display HTML
Allow remote resources
Display attached images below the message
|
After message delete/move display the next message
Display emoticons in plain text
Default character set
|
|
Composing Messages
|
Compose in a new window
Compose HTML messages
Automatically save draft
Always request return receipt
Place replies in the folder of the message being replied to
When replying
Messages forwarding
Default font of HTML message
Default action of Reply all
In the HTML editor, ‘enter’ is a newline instead of a new paragraph
Enable emoticons
Signature options
Automatically add signature
Place signature below quoted message
|
When replying remove original signature from message
Force standard separator in signatures
Spellcheck options
Check spelling before sending a message
Ignore words with symbols
Ignore works with all letters capitalized
Advanced options
Attachment names
Use MIME encoding for 8-bit characters
Save the browser’s local storage (temporarily)
|
|
Contacts
|
Default address book
List contacts as
Sorting column
|
Rows per page
Skip alternative email addresses in autocompletion
|
|
Special Folders
|
Show real names for special folders
Drafts
|
Sent Items
Spam
Trash
|
|
Server Settings
|
Mark the message as read on delete
Flag the message for deletion instead of delete
Do not show deleted messages
If moving messages to Trash fails, delete them
|
Directly delete message in Spam
Clear Trash on logout
Compact Inbox on logout
|
|
Calendar
|
Default view
Time slots per hour
First weekday
First hour to show
Working hours
Event coloring
Default reminder setting
Create new events in
|
Display week numbers
After an invitation or update message is processed
Category colors
Display birthday calendar
From which address books
Birthday reminder settings
|
Back to top
Folders
Allows you to manage mailbox folders. You can select the folders that you want to be displayed, and you can create, rename or delete personal (not system) folders.
Identities
This section allows you to establish the:
- Name that appears on outgoing email messages
- The Organization name that is displayed
- Reply-to address
- The signature that appears in all outgoing messages
Responses
This section allows you to create and save text that you can use when replying to messages.
Back to top
Other accounts
This section allows you to add another email account to be displayed in the Webmail inbox.
Password
The section allows you to change the password for your account and set up additional security like two-factor authentication and app-specific passwords if it's enabled.
Autoresponder
This section allows you to create a message that will be sent in reply to all incoming email messages during a specific interval, such as when you are on vacation.
Spam settings
Allows you to create lists of allowed and blocked senders.
Back to top
Mail forwarding
When enabled, incoming messages will be forwarded to the recipients that you list in this section.
Password recovery
Allows you to set up a backup phone number and email address to recover your password via email or SMS.
Filters
This section allows you to define how incoming mail is handled automatically.
External access
This section provides all the information needed to sync your email, contacts or calendar to an external client, like Mac Mail, Outlook, or Thunderbird.
Back to top
How do I change my password?
- In the Settings window, click Password.
- Type your current password in the Current password field.
- Type your new password in the New password field.
- Re-type your new password in the New password (again) field.
- Click Save.
Back to top
How do I enable and disable my vacation or out of office alert?
To enable a vacation or out-of-office alert, you need to set up an autoresponder message.
- In the Settings tab, click Autoresponder.
- In the Autoresponse text field, type the message you would like automatically sent in reply to all incoming email messages.
- Click the Enabled check box.
- In the Interval field, enter the number of days before the same recipient will receive the auto-response message again. If not specified, the interval defaults to one day.
- Click in the End date field, and select the date when you want to stop the autoresponse message from being sent.
- Click Save.
To disable autoresponder
- In the Settings tab, click Autoresponder.
- Remove the checkmark from the Enabled checkbox.
- Click Save.
Back to top
How do I enable and disable my email signature?
- In the Settings tab, click Identities.
- Select your email account or Create.
- In the Signature field, enter the signature details to appear at the end of all outgoing email messages.
Note: If you primarily send formatted (HTML) messages, you can enable the HTML option which allows you to add formatting of your signature.
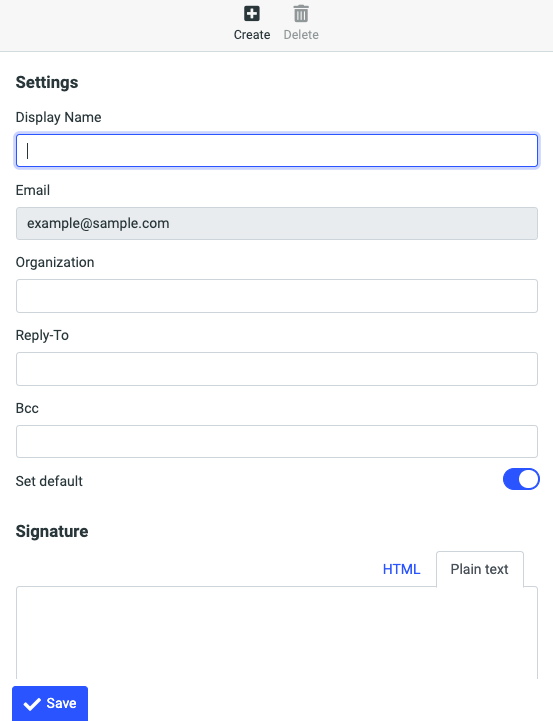
- Click Save.
To disable an email signature
- In the Settings window, click Identities.
- Select your account.
- Delete the text in the Signature text field.
- Click Save.
Back to top
What are Mail filters?
A filter is a set of conditions that you define to handle incoming email automatically. You can set filters to sort incoming email to various folders, delete unwanted messages, or forward messages to other email accounts. The action you prepare is triggered when the rules you create are found to be true.
Webmail can analyze the following fields in the message header: Subject, From, To, size, and a wildcard that you can define.
The fields can be evaluated according to the following conditions: Does or does not contain, is or is not equal to, does or does not exist and does or does not match expression. You define the value of the condition.
What is plus sign tagging and how do I use it with filters?
Plus sign tagging allows you to identify and filter incoming email according to a tag that you add to your email address when you give your email address to an individual, a group, or a business.
To use plus sign tagging, you just enhance your email address by adding a plus sign (+) after your name—but before the @ symbol—followed by some identifying text. You can set up filtering rules that recognize incoming mail that is sent to the tagged address and move it to a specific folder.
By using the plus tagging feature, you will also know whether your email address has been sold to a third party. If you start receiving unwanted or spam email that is addressed to your plus sign tagged email address, you will know that your email address was sold, and you can easily create a filtering rule that deletes any future email that is sent to that tagged address.
Back to top
How do I add or remove mail filters?
To add a filter
- In the Settings list, click Filters.
- Click Create from the toolbar.
- In the Filter name field, enter a name for your filter.
- Under Scope, select when you want the filter to act.
- Matching all of the following rules
- Matching any of the following rules
- All messages
- Specify the Rules:
- From the first drop-down list, select the message area that you want to evaluate (From, Subject, To, etc.).
- In the next drop-down list, select a condition (contains, does not contain, etc.).
- In the text field, type in a value for the filter to evaluate incoming mail against.
- Click the Plus sign (+) to add additional rules, the Gear to set modifiers to the rule, or the Trash to remove a rule.
- In the Actions section, select how you want the filter to handle messages that match the conditions you defined:
- Move message to
- Redirect message to
- Discard with message
- Delete message
- Keep message in Inbox
- Stop evaluating rules
- Click the Plus sign (+) to add additional actions or the Trash to delete an action.
- Click Save.
To remove an existing filter
- Click Settings, and select Filters.
- Under the existing Filters List, and select the filter you want to remove.
- Click the Actions icon and then choose Delete.
- The filter is removed from the Filters list.
To disable a filter
- Click Settings, and select Filters.
- Under the existing Filters list, click the filter to select it.
- Click the Actions gear icon and then choose Enable/disable filter set.
Optionally, in the Filter definition pane, toggle on Filter disabled and click Save.
- The filter is greyed out in the Filters list and will not execute, but can be re-enabled at a later.
Back to top
How do I add or remove another email account?
- In the Settings tab, select Other accounts.
- Click Add.
- Fill in the email, username, password, server address, server port and if SSL should be used based on the information provided by your email provider.
- Select the Leave a copy of the message on the server check box if you want to leave your read email messages on the other server.
- From the Default folder drop-down, choose the folder to which you want to save the email messages that are retrieved from the other account.
- Select the Test connection on save option if you want to test the connection to this account when you save the configuration.
- Select the Import old messages option if you want to import all existing messages from the account. If you don't select this option, only new, unread messages will be imported.
- Click Submit.
Back to top
How do I set an allowed or blocked senders list?
The allowed and blocked senders lists let you create a list of senders that will either be automatically allowed and bypass your spam filter or be automatically blocked from being received into your inbox.
Addresses that are in your Contacts are considered to be in your allowed senders list even though the contact entries are not displayed in the allowed senders list. If you add an address to the blocked senders list that is also in your Contacts, the address will be blocked as the blocked senders list takes precedence over your Contacts.
The allowed and blocked senders list uses the star (*) as a wildcard which lets you set up to block or allow any emails from a specific domain. These should be used with caution as you may accidentally block every email sent from *@gmail.com for example.
You can add up to 1,000 entries each in the allowed and blocked list.
To adjust the allowed or blocked senders list
- In the Settings tab, click Spam settings.
- Add or remove the email address on a separate line to the Allowed senders list or the Blocked senders list text field.
Note: If you want to block an entire domain, use the star (*) to denote a wildcard before the at (@) symbol.
- Select Save when you’re done.
Back to top
Admin
What is the Admin component?
The Admin component allows domain administrators to administer email accounts. They can perform common administrative tasks for email, such as resetting passwords, creating, deleting, and modifying users. Domain administrators can also add/remove workgroups and workgroup administrators and manage and brand their domain.
Back to top
Managing users
Note: The tasks in this section are only available to domain administrators.
How do I create a new user?
- Click Admin.
- Click Add User.
Note: All fields are disabled until you enter to complete the User field and press enter.
- Complete the fields as outlined in the table below and then click Create or Create & Repeat. If you click Create & Repeat, the new user is created, and the Add User window remains open so that you can create another user.
Note: Depending on the type of user that you are creating, you may not see all of these fields.
Back to top
Basic Settings
|
Field
|
Description
|
Obligation
|
|
Type
|
From the drop-down list, choose the type of account: Mailbox, Forward, or Filter.
- Mailbox: This is a regular mailbox.
- Forward: Automatically forwards mail to another specified mailbox. Mail cannot be sent from a forward-only user account nor is mail stored in a forward-only account.
- Filter: Stops spam messages but allows non-spam messages to flow through to a target account.
|
Required
|
|
User
|
Enter a name for the new user, and then press the enter key.
Names can be up to 64 alphanumeric characters including underscore, period, and hyphen symbols. The first character must be alphanumeric.
Diacritics and special characters are not allowed, underscores or hyphens cannot be used as the first character, periods cannot be used as the first or last character, and two consecutive periods cannot be used.
|
Required
|
|
Password
|
Enter an initial password for the mailbox.
Can be up to 54 alphanumeric characters including the following special characters: ~ ! @ $ % ^ & * ( ) - _ = + / \ ] [ { } : ; > < , . | ? # '.
|
Required
|
|
Workgroup
|
From the drop-down list, choose the workgroup to which the new mailbox account will belong.
|
Optional
|
|
Aliases
|
Enter the alternative names for this mailbox. Messages that are sent to an alias are delivered as if they were sent to the actual mailbox. Addresses must be separated by a carriage return.
|
Optional
|
Back to top
Sending & Receiving
|
Field
|
Description
|
Obligation
|
|
Delivery
|
For mailbox accounts, choose whether incoming mail is delivered to the local mailbox, forwarded to another address, or both.
Note: This field is not editable for Filter or Forward accounts.
|
Required
|
|
Autoresponder
|
When this box is checked, the autorespond feature is enabled.
|
Optional
|
|
SMTP Limit
|
The maximum number of messages that a user can send in a 24 hour period.
|
Not editable
|
|
Quota (MB)
|
Specify the maximum storage size for the mailbox. The default setting is taken from the domain level.
|
Required for mailbox accounts
|
|
Receive
|
From the drop-down list, choose whether the user can receive email.
|
Required
|
|
IMAP4
|
From the drop-down list, choose whether the user can connect with an IMAP4 client.
|
Required
|
|
POP3
|
From the drop-down list, choose whether the user can connect with a POP3 client.
|
Required
|
|
Send
|
From the drop-down list, choose whether the user can send email.
|
Required
|
|
Webmail
|
From the drop-down list, choose whether the user can receive mail through Webmail.
|
Required
|
|
Webmail Send
|
From the drop-down list, choose whether the user can send mail through Webmail.
|
Required
|
Back to top
Forwarding
|
Field
|
Description
|
Obligation
|
|
Reply-To
|
Replies to forwarded messages are automatically addressed to the specified address.
|
Optional
|
|
Subject Prefix
|
Enter a tag that will be prepended to the Subject line of forwarded email messages.
|
Optional
|
|
Restricted
|
When this box is checked, any mail sent from a user that is not listed in the Forwarding text box is rejected.
|
Optional
|
|
Recipients
|
Enter the email addresses to which you want the forwarded email to be sent. Enter the full email addresses a separate line.
When someone sends a message to a user that has Forwarding enabled, everyone on the list gets the message. If a Reply-to address is specified, when any of those recipients reply to the forwarded message, the reply message is addressed to the specified reply-to user. This feature is useful for mailing lists so that replies are addressed to the list instead of the sender.
|
Optional
|
Back to top
Autoresponder
|
Field
|
Description
|
Obligation
|
|
Enabled
|
Click to put a checkmark in this box to enable the autoresponder.
|
Optional
|
|
Interval
|
Enter the number of days before the same recipient will receive the auto-response message again.
|
Optional
|
|
End Date
|
Enter the last day/time when the auto-response message is in effect. The required format is YYYY-MM-DD.
|
Optional
|
|
Autoresponse Text
|
The text of the message that is sent when auto-responder is enabled.
|
Optional
|
Back to top
Spam Settings
|
Field
|
Description
|
Obligation
|
|
Spam Header
|
Enter the text that you want to be added to the header of spam messages. The format must begin with a capital letter, but can be followed by anything, for example, X-Spam: Spam detected.
|
Optional
|
|
Spam Tag
|
Specify the tag that is appended to the subject of all spam messages.
If Use default is checked, the tag that is used is the one that was specified for the domain.
|
Optional
|
|
Spam Folder
|
From the drop-down list, choose the folder where you want spam delivered. The default is the Spam folder.
|
Optional
|
|
Spam Level
|
From the drop-down list, choose the level of aggressiveness for spam filtering.
Choosing a level other than Normal causes the filtering engine to be more aggressive in labeling mail as spam, and it may also result in more false positives. If you don't specify a spam blocking level, the account uses the domain, company, or global setting.
|
Optional
|
|
Reject Spam
|
If this box is checked, all incoming messages that are deemed to be spam are rejected rather than being quarantined or tagged.
|
Optional
|
|
Allow
|
Enter the domains and email addresses that are considered to be safe for this user. When messages are received from any of the addresses on this list, they are always delivered to the user's Inbox.
Make sure that each entry is on a separate line. You can add up to 1000 entries in this list, and you can use up to five wildcards(*) in any given entry.
Note: Addresses that are in the user's Address Book are considered to be in the Allow list for that user by default, even though the Address Book entries are not displayed here in the Allow list.
|
Optional
|
|
Block
|
Enter the domains and email addresses that you want to add to the block list for this user. When messages are received from any of the addresses on this list, they are always considered to be spam. Make sure that each entry is on a separate line, separated by a carriage return. You can add up to 1000 entries in the list, and you can use up to five wildcards in any given entry.
Important: If an Address Book entry is added to the Block list, the address will always be blocked, that is, the Block list takes precedence over the Address Book.
|
Optional
|
Back to top
Webmail & Metadata
|
Field
|
Description
|
Obligation
|
|
Brand
|
The brand that you select determines the look and feel of the user’s Webmail interface. Choose a brand from the drop-down list only if you want the user account to use a brand other than the domain brand.
Note: If you use this field to assign the domain brand to each user, and then you change the domain brand, it will not be reflected at the user level because the user's brand setting overrides the domain's brand setting.
|
Optional
|
|
Language
|
From the drop-down list, choose the language in which the mailbox will be displayed when the owner initially logs in to their account. The user can change the language at the mailbox level if they want to view their mailbox in another language. From the drop-down list, choose the language for the Webmail interface.
|
Required
|
|
Timezone
|
From the drop-down list, choose the timezone that the mailbox will use. The user can change the timezone setting at the mailbox level if they want to use another timezone.
|
Required
|
|
Max Addressbook
|
The maximum number of groups and contacts that the user can store in their address book. This setting cannot be edited.
|
Optional
|
|
Name
|
Enter the first and last name of the mailbox owner.
|
Optional
|
|
Title
|
Enter a title for the user, if applicable.
|
Optional
|
|
Phone
|
Enter the user's phone number.
|
Optional
|
|
Fax
|
Enter the user's fax number.
|
Optional
|
Back to top
How do I view and modify users?
- Click Admin and then click Users.
- To search for specific users, enter search criteria in the User field at the top of the page, and then click Refresh. You can enter the exact name of the user you are looking for, and you can use a wildcard. Alternatively, you can choose to view only certain types. In the Type area at the top of the page and remove the checkmarks from one or more of the boxes.
- Click a user to view and modify the associated properties.
- Click Update.
- For an explanation of most of the displayed fields, see How do I create a new user?". When you view the details for a user that has already been created, the following sections and fields are also displayed.
Back to top
Basic Settings
|
Field
|
Description
|
|
Status
|
Indicates the current state of the account:
- Active: Account is available, and all applicable services are enabled.
- Suspended: Some part of the account has been suspended, usually the ability to send messages. This is likely because they are suspected of sending a lot of spam messages.
- Smtplimit: Account has reached the available SMTP limit and cannot send messages until the time shown in the Sending Availability chart.
- Quota: Account has reached the available quota limit. They cannot receive or store messages until they delete messages and/or files to free up storage space.
|
Back to top
Tools & Status
|
Field
|
Description
|
|
Rename User
|
Click this link to change the user name.
Caution: If you rename a user, all of the history that is associated with that user is deleted and cannot be accessed by the email restore tool or the address book restore tool. The renamed user account begins accumulating history (backups) starting from the date that you rename the user, and email and address book information can be restored only from this new history.
|
|
Logout User
|
Click this link to terminate all of the user's active IMAP and POP sessions.
|
|
Last Login
|
The last time that the user logged in.
|
|
Quota
|
The number of megabytes that the user is currently using, and the current number of messages the user has in their account.
Note: Messages in the Spam folder are not included in this total.
|
|
Addressbook
|
The total number of contacts and groups that the user has in their address book.
|
|
Sending Availability
|
The maximum number of messages that the user can send at each of the specified times. This information is useful if the user wants to send a large batch of messages and needs to know how soon and how many messages they will be allowed to send.
|
Back to top
How do I suspend a user?
The most common reason that you might want to suspend a user is that they are suspected of sending a lot of spam messages. You can suspend one or more services to achieve the suspended state appropriate to your business needs. The services that you see depend on the type of user account.
Note: Suspended users remain billable.
To suspend user services
- Click Admin, and then click Users.
- To narrow your search, in the User text field, enter all or part of the username whose mailbox you want to delete. You can also select the workgroup to which the user belongs from the Workgroup drop-down list, and select the type of account from the Type options. Click Filter.
All of the users that meet your criteria are displayed.
- Click the user whose services you want to suspend.
- In the Sending & Receiving section, from the relevant drop-down lists, choose Suspended, and then click Update.
|
Service Suspended
|
Result
|
|
Receive
|
The user can access their existing mail through an email client, email messages can be composed and sent, but no further mail will be received.
|
|
IMAP4
|
Connection to the user account with an IMAP4 client is denied.
|
|
POP3
|
Connection to the user account with a POP3 client is denied.
|
|
Send
|
The user can access their existing mail through an email client, incoming email messages will be downloaded, but no mail can be sent.
|
|
Webmail
|
Account login to the Webmail client is denied.
|
|
Webmail Send
|
The user can receive mail via Webmail but cannot send mail through Webmail.
|
Back to top
How do I delete a user?
- Click Admin, and then click Users.
- To narrow your search, in the User text field, enter all or part of the username whose mailbox you want to delete. You can also select the workgroup to which the user belongs from the Workgroup drop-down list, and select the type of account from the Type options. Click Filter.
All of the users that meet your criteria are displayed.
- Click the checkbox beside the mailbox that you want to delete, and then click Delete.
A confirmation message asks you to confirm that you want to delete the mailbox.
- Click Ok to confirm the deletion.
Back to top
How do I restore a deleted user?
If a user account that has been deleted for 30 days or less, you can restore it. If the user does is not listed on the Deleted Users page, it cannot be restored. You can restore a user account to its original name only if that name has not been reissued during the period in which the account was deleted.
To restore user accounts
- Click Admin, and then click Deleted users.
- Search for the user you want to restore in the User field at the top of the page. You can use wildcard characters to represent to represent part of the name.
- Click the checkboxes next to the user(s) that you want to restore.
The number on the Restore selected button changes to reflect the number of users that you selected.
- Verify that the Restore as field displays the correct user name. If you want to restore the user and rename it, enter the new name in this text field.
- Click Restore selected.
How do I restore deleted mail for a user?
Mail that has been deleted for 14 days or less can be restored to the user's account.
Note: Email messages must have existed in the account long enough for a backup to have been done for them to be restored.
To restore deleted mail
- Click Admin, and then click Users.
- Search the name of the user you want to restore in the User field at the top of the page. You can use wildcard characters to represent to represent part of the name.
- Click the user whose mail you want to restore.
- On the left pane, under the user's name, click Restore email.
- From the Folder drop-down list, choose the folder that contains the mail you want to restore, and then click Search.
- Click the checkbox beside each of the messages that you want to restore.
The number on the Restore button changes to reflect the number of messages that you selected.
- Click Restore.
Back to top
How do I release spam messages for a user?
Spam messages are quarantined by the Webmail email filters. Occasionally, a legitimate email will be tagged as spam. You can release one or more email messages from quarantine, and the messages will be moved to the user's Inbox.
To release spam messages
- Click Admin, and then click Users.
- Search part or all of the name of the user whose spam messages you want to release in the User field at the top of the page. You can use wildcard characters to represent to represent part of the name.
- Click the user whose spam messages you want to release.
- In the left pane, under the user's name, click Release spam.
- You can search for specific messages by using the From, To, and Subject to filter the results.
- Click the checkbox for each of the messages that you want to release. You can click the checkbox at the top of the list to select all displayed entries.
- Click Release.
Back to top
Where can I view usage data for a user?
Usage statistics are summaries of account usage and are displayed as graphs. Statistics are available can be viewed as a summary in graphical format, or as detailed snapshots in CSV format.
- Click Admin, and then click Users.
- Search enter part or all of the name of the user you want to restore in the User field at the top of the page. You can use wildcard characters to represent to represent part of the name.
- Click the user whose data you want to view.
- On the left pane, under the user's name, click Stats.
- From the Interval drop-down list choose the period for which you want to view statistics: Day, Week, or Month.
- From the Graph type drop-down list choose the type of data that you want to view:
- Logins: POP3, IMAP4, and Webmail.
- Message bytes: Inbound and relayed email, in KBs.
- Message counts: Normal deliveries, spam deliveries, autoresponses, forwards, destination recipients, and outbound messages.
- Storage: Storage used, in MBs.
The graph appears at the bottom of the page.
Back to top
Using workgroups
How do I create a workgroup?
Workgroups are useful for organizing users into categories. Every new domain automatically includes one default workgroup called staff. You can create additional workgroups for any domain. You can assign users to specific workgroups when you create users or when you modify users.
- Click Admin, and then click Add Workgroup.
- In the Create workgroup pop-up, enter a name for the new workgroup, and then click Create.
- The new workgroup will be in the list of existing workgroups.
Back to top
How do I add users to a workgroup?
- Locate the user that you want to add to a workgroup.
- Click the user name.
- In the Basic settings section, from the Workgroup drop-down list, select the workgroup to which you want this user to belong.
- Click Update.
How do I delete a workgroup?
You can delete any workgroup except the domain's default workgroup, staff. We recommend that you move all of the users out of a workgroup before you remove that workgroup.
- Click Admin, and then click Workgroups.
- Click the checkbox next to each of the workgroups that you want to delete
The number on the Delete Selected button changes to reflect the number of workgroups that you selected.
- Click Delete Selected.
- In the confirmation pop-up, confirm that you want to delete the selected workgroups.
- Optionally, in the Delete Workgroups dialog, click the checkbox to select the Cascade option which deletes any users that are in the workgroup. If you don't choose this option, and there are users in the workgroup, the delete operation will fail.
- Click Delete.
Back to top